
Copyright © 2023-2025 by Conroy & Conroy Company, all rights reserved
The erasmus Bible app is an electronic tool whose purpose is to aid in Bible study. This document is designed to help you get the most out of your use of erasmus.
The erasmus Bible app comes with of a collection of reference works. These works are typically electronic versions of books, such as Bibles, commentaries, and Bible dictionaries. Although you can merely read these reference works on your phone or computer, erasmus provides ways for you to dig into the material and get more out of it. For instance, you can cross-reference between different Bible versions and/or commentaries. You can also cross-reference between Bible versions and encyclopedia articles, photos, and maps.
Library collections
The erasmus Bible app comes with a choice of libraries. The Inspiration library consists of Bibles. The Reference library adds encyclopedias and more Bible versions. The Explorer library adds original language support in the form of lexicons and interlinears. The Deluxe library adds more bibles, more commentaries, and other resources. There are some features that are supported with all libraries, while other features are only with certain libraries because they require additional data or specific reference works. The larger the library, the more reference works are included and the more connections between them.
Note that the actual space required for a given library will differ from platform to platform. For instance, Android and iPhone platforms typically require more space than Windows or Mac. You should check the download page on the erasmus Bible app site for the actual sizes and other requirements for each library and platform for the current version of erasmus.
erasmus Versions
Libraries have to do with which reference works are provided, while erasmus versions have to do with which features the app provides. For each version of the erasmus Bible app, you have all of the libraries to choose from. While the provided reference works are different, the the same program is provided with each library. When a new version of erasmus is released, it is included with whichever library you choose to download. One app, many libraries.
Updated versions usually provide new features and other improvements from the previous version. Typically, there are minor updates/corrections to some of the reference works in each library as well.
The erasmus Bible app is multi-platform, meaning that there are versions of it available for different hardware. There are 32-bit and 64-bit versions for Microsoft Windows and Android, plus versions for both Intel and ARM Macs, and also IOS (iPad, iPhone). erasmus is designed to work very similarly between all the different versions and platforms. But there are slight variations to accommodate what is expected by users of the different platforms.
If you don't have a touch screen, you will need a mouse or mousepad. A mouse can be used in the place of your fingers: when the left mouse button is down, the mouse pointer operates as if you were touching the screen at that point. If you have both touchscreen and mouse, you can use either or both. Any time we use the term "tap", that also means "left click" with the mouse.
If you have a keyboard on your platform, like a PC, certain keys can be used as shortcuts to most functionality (see the section on Keyboard shortcuts). On Windows and Mac, you also have a menu that can be used to perform many operations. The menu is normally hidden on Windows, but you can make it appear by pressing the Alt key. Pressing the Escape key will hide the menu again.
On non-mobile devices, scrollbars are shown where text can be scrolled. On touch screens, the text is scrolled by using your fingers. When scrolling the main text panes on mobile devices, a "thumb" (looks like a square with two arrows) will appear that you can use to scroll quickly through the text of the reference work you are viewing. The thumb will disappear automatically after a couple seconds of non-use.
Also on Windows and Mac, if the mouse pointer is positioned over a reference to a verse or topic, a "hover" box will show that displays that reference. Hovers can happen in other contexts, such as providing a definition of the original language word over which the mouse pointer is sitting. Hover can be adjusted or disabled/enabled through options dialogs. Hover doesn't show on platforms without a mouse or mousepad. See the section on Hover.
The screen metrics (height and width) can be changed by rotating the mobile device between portrait and landscape. On Windows and Mac, the window can be resized as desired, just like other Windows and Mac applications.
erasmus is designed to be easy to use, while providing a host of features. The basic operation of the app involves typing in the Bible verse (or beginning verse of a passage) in the main search box at the top of the app. The app will open to that location in your default Bible version. You can then drag scroll (or use the scrollbars) to scroll up or down through the text.
Most anywhere you tap on the screen will result in a popup box that will allow you to explore more in regard to what you tapped on. For example, if you tap on Bible text, you will see a popup that allows you to get more information on the word and paragraph you tapped on. This includes such features as: copying text to the clipboard, seeing definitions of a word, seeing articles on a topic, and so forth. To see more information on a verse (such as related verses), tap on the verse number in the text. Explore your options by tapping on different things on the screen.
You can also enter a topic name in the main search box to see an article on that topic. Likewise, you can type a Strongs number (starting with "h" for hebrew or "g" for greek) to bring up a definition of that word.
If you enter something in the main search box that is not recognized as a verse reference, topic name, or Strong's number, it is interpreted as text to search for. Because there are so many possible topics, you may find it useful to force a search by starting the text with a quote (") - otherwise a topical article might show up.
To access the various tools provided by the app, you can tap on the main options icon at the upper right of the screen. In the popup menu you can then tap on such things as the Bible Reading Plan, Prayer Journal, and Memorization tools. You can also open your library to see any of the reference works you have installed. Tapping a work in your library list will open that work.
Note that the standard "back" option on your device can be used to get rid of any popup or dialog. Clicking on the text outside of the popup can also close it. On Windows and Mac, the escape key can be used to perform the same action.
Also, on Windows and Mac, moving the mouse pointer over a reference and leaving it there for a while will show a "hover" popup. This allows you to see the text of a verse, topic, etc. without having to tap on the reference. This popup can be made to go away in the normal ways (see above) or by simply moving your mouse pointer over other text.
There is a lot more to erasmus. The rest of this document describes the details of the user interface and the features of the app.
The user interface is designed to make using the app easy, but it might not be apparent to someone new to erasmus what all of the features are. You can explore by tapping on things or by reading this documentation. But there are some useful customizations you can do when you first start using the app that will make it even easier, based on your individual tastes.
Of first importance is to adjust the size of the text. Note that most people will want the text to be slightly larger than is necessary to comfortably read it so that it is easier to tap on the desired text. The default text size when you first start erasmus is defined by the platform upon which you are running it. If normal text on your device is adequate, then it will probably be adequate in erasmus as well (however, note the foregoing comment about ease of tapping on text). Also note that headers and titles in text will tend to be larger than normal text, so adjust the size according to the normal text.
You can change the default text size at any time. This can be done in multiple ways, depending upon what device you are using. The method that works on all devices is to go to the Program Options, select the Text tab, and then drag the pointer left or right until the sample text is the desired size (left makes the text smaller; right makes the text larger).
On devices with touch screens: you can do the normal zoom in/out gestures with two fingers.
On Mac and Windows, you can use the main menu to increase or decrease the text size. On Windows, press the Alt key to make the menu show. Then go to the Options | Font, and choose the increase/decrease from the child menu, as desired. Note: on Macs, the menu is always visible.
Although the default Preferred Reference works order is sufficient for many people, everyone has their favorite reference works and Bible versions. So you should open the Preferred Reference works dialog from the Main Options menu, go through each category and make sure your favorite reference work(s) are at the top of the list. See the section on Preferred Reference works for details.
This affects which Bible, lexicon, or encyclopedia will open when you type in a verse, word or topic. If you add panes to a tab, the new panes will open the next reference work, as appropriate, in the ordering list.
Also, when you tap or hover over a reference, the first reference work in your ordering list (which has the verse/topic/word) will be the one whose text is shown.
There are many books that are considered "devotional". But in the case of erasmus, "devotional" has a specific meaning. A devotional is a reference work that has individual, relatively short, devotions that are usually tied to a day of the year, day of the month, day of the week, or some such. The purpose of these works is to provide you an encouragement with which to start your day (and sometimes to end it as well). The erasmus Bible app provides special features for these kinds of works.
If the library you are using comes with devotionals, you can have erasmus start up by opening to one of them, or even having the devotions tab automatically update to the current devotion. If you open a devotional through the Main menu, "Open Devotional" item, erasmus will remember that tab is the devotions tab. If it is time for the devotion to change (based on a new day, for instance), that tab will be updated - unless you've closed it. If you open a devotional through other means, such as via the Library dialog, the associated tab will not be updated. Depending upon your settings and which devotionals you have in your library, the update will vary. For instance, if you are using Proverbs, the update happens at midnight (or shortly thereafter). In fact, most devotionals are daily. On the other hand, if you are using "Morning and Evening", there are two devotions for every day: morning and afternoon. A devotional tab opened to this work will update at midnight and at noon. Some devotionals have devotions for specific days, while others are random. It depends upon the devotional in question.
By default, erasmus will open Spurgeon's Morning and Evening to the current day each time you start the app.
Unlike Bibles and other reference works, devotionals do not have preferential "ordering". Instead, you choose which devotional you want in the Program options dialog, Devotional tab (Click on the main program options, then on the Devotions tab). In this tab, you can specify whether or not you want the devotions tab to automatically update, and you can choose startup behavior for erasmus.
The purpose of opening to a devotional is to remind you to read it when you start the app each day. There are three options in the Devotions tab:
View most recent tab. This simply opens erasmus to where you left off - the last focused tab is the tab that you will see when erasmus starts. In other words, the app does not open directly to a devotional.
View Proverbs chapter for the day. This opens the book of Proverbs in your default Bible to the chapter corresponding to the current day. In other words, if it is June 7th, Proverbs chapter 7 will open.
Open devotion tab to: This opens to a devotion tab that views the current devotion for the devotional you have chosen from the list.
To set up erasmus' devotional behavior, click the circle/dot that indicates your desired behavior. If you chose the third option, then select your desired devotional from the list below that.
Other than scrollbars and main menus, the interface looks nearly identical on all platforms. Most features are available within one or two taps. You can back up to a previous state with either the mobile device back button, the escape button (on keyboards), or the back button that appears in the upper left corner of dialog boxes. Also, drop-downs and popups go away if you tap on the app outside of the drop-down/popup.
The basic layout of the erasmus Bible app looks like this:

1. At the top is the navigation panel.
2. Just below the navigation panel is the tab bar. This doesn't show until/unless you have one or more tabs open.
3. Most of the screen is the reference work view. Text and images for a reference work appear here.
If you are not familiar with the terminology, here are the definitions of some terms:
Dialog box: A box that appears over the app in response to an action you have performed (such as tapping on a menu item). These boxes are temporary and disappear when you go "back", or complete whatever operation the dialog exists for.
Dragging: A drag operation involves you touching the screen, then moving your finger while it is still in contact with the screen, then removing your finger from the screen. For instance, tabs can be closed by dragging the tag name on the drop-down menu to the right. Also, text can be dragged up or down in text panes.
Drop-down: A box that expands down (or up) from a tapped item, which contains information or menu items.
Hover: When a mouse is used and the mouse pointer is moved over a reference, and left there for a moment, a hover popup shows up that reference. For instance, if over a verse reference, the hover popup will contain that verse as it appears in your default Bible. Moving the mouse pointer out of the hover popup area will make the hover disappear. See the section on Hover for details.
List: A named collection of verses and/or topics that you can create and modify. See the section on lists for more details.
Menu: A quick means of performing some action in erasmus. Menus are of two types: main menus (only on Mac and Windows), and drop-down menus (all platforms). The latter is a drop-down that contains options that are performed when you tap on one. In either type of menu, tapping on an item either opens a sub-menu or selects the action that was tapped.
Multipane Tab: A tab containing multiple panes. See the discussion of Multipane tabs for detailed information.
Popup Menu: a set of options that shows over the text when you tap on the text or some buttons. This is like a drop-down but it shows near where you tapped on the screen.
Reference Works: Basically a book, such as a Bible, Commentary, Encyclopedia, etc. Or some other source of information (such as this help text).
Scrollbars: A vertical or horizontal bar used to position text and/or images that are too tall or wide to fit the screen. Typically these only appear on Windows and Mac systems. If you have a touch screen, you can touch and drag the text/images.
The navigation bar is the main way to open a reference work. The parts of the navigation bar are:

1. Back/forward buttons
2. Reference/search box
3. Drop-down button
4. Open button
5. Main Options button
6. User
You can enter the reference you want to open in the search box. For instance, you can type "Gen 12:10" to open a Bible to that location. You can also type a topic (such as "Love") to open an article to that topic - if you have an encyclopedia that has an article on "Love". If you have lexicons, you can enter a strong's number for a Greek or Hebrew word to bring up the definition of that word. For instance "g250" would open the definition for the Greek word with the Strong's number 250. Likewise, entering "h2" would open the definition for the Hebrew word with the Strong's number 2. If you enter something that is not recognized as a verse, topic, or strong's number, the reference work for the current tab is searched for what you typed in. We will discuss searching later. Note that if you want to search for "fruit" rather than opening an article on "fruit", you can begin the text with a quote ("). Anything following that quote is treated as text to search for. See the section on Searching for more information.
You can specify a specific reference work to use when you open a reference by prefixing the reference with the reference work name (full name or abbreviation) and a colon. For instance, entering:
KJV:Matt 5:1
would open the King James Version Bible to Matthew 5:1.
If you press the drop-down button, a list of the last five things you entered into the search box are shown. You can tap any of those to perform that open operation again. Pressing the button again will hide the list.
The Back/Forward buttons are used to navigate back and forward like a browser when you move around in a reference work.
The open button performs the same action as pressing ENTER on a keyboard - it tells erasmus to open the specified reference (or perform a search).
The Main Options button will open a drop-down menu with various options.
The user image appears differently depending on whether or not you are logged in to your account. The image
shown here represents that you are not logged in. If you are logged in, the profile picture you uploaded to your account is shown. If you didn't upload a picture and you are logged in, a colored silhouette is shown in place
of the grey one.
When you tap the account image/picture, an account drop-down menu is shown. The contents of this drop-down depends upon whether or not you are signed in. This drop-down resembles the following:

Here are the items that you can see if you are not signed in:
1. Sign in. Tapping this item will prompt you for your username and password to allow you to log in if you are not logged in currently.
2. Create an account. Tapping this item will take you to a registration box where you can enter information necessary to create a new account. Note: accounts are not required (and provide no benefit) unless you purchase add-ons.
3. Email me alerts. Tapping this item will prompt you for your email so you can sign up for email alerts without signing up for an account.
Here are the items that you can see if you signed into your account:
3. Sign out. Tapping this item will sign out of your account.
4. Upload new image. Tapping this item will allow you to upload a new account image.
5. Manage account. Tapping this item will allow you to modify your account details.
6. Refresh. Tapping this item will refresh your log in. See details in the section on Accounts.
Tapping this button drops down the main options menu. Some options may not display depending upon which reference works you have access to. See the section on Program Options for details. The drop down resembles the following:
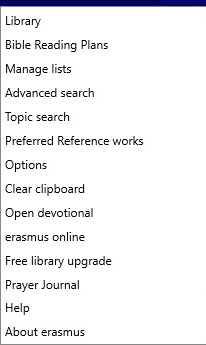
Library
This will bring up the library dialog, which resembles this:

You can tap the button corresponding to what you want to open.
Bibles. Tap this button to see an alphabetical list of all available Bibles. Tap the Bible you want to open.
Categories. Tap this button to see a list of all reference works, grouped by category (Bibles, Commentaries, Lexicons, etc). Tap the reference work that you want to open.
Titles. Tap this button to see a list of all reference works, sorted by title. Tap the reference work that you want to open.
Authors. Tap this button to see a list of all reference works, sorted by author. Tap the reference work that you want to open.
Lists. Tap this button to see all lists that you created. You can tap the list you want to open. This will create a new tab with a list pane on the left. See the section on Lists.
Plans. Tap this button to see a list of all Bible Reading Plans. You can tap the list you want to open. This will create a new tab with a plan pane on the left. See the section on Bible Reading Plans.
When you open a reference work via the Library dialog, the reference work is opened to the title page of that reference work.
Bible Reading Plans
This opens the Bible Reading plan dialog. See the section on Bible Reading Plans.
Manage lists
This opens the list management dialog. See the section on Lists for details.
Advanced search
This opens the Advanced Search dialog. See the section on Searching.
Topic search
This opens the Topic Search dialog, which allows you to find a topic and open an article to it. The dialog resembles the following:
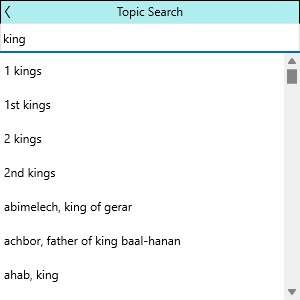
Enter the topic text you wish to search for. All topics containing that text are shown in the list below. Tapping on one of those topics will open an article to it.
Preferred Reference works
Tapping this item opens the Reference Work ordering dialog. See the section on the Preferred Reference works.
Options
Tapping this item opens the Options dialog. See the section on Program Options.
Clear Clipboard
Tapping this item clears the contents of the clipboard.
Open devotional
Tapping this item opens the default devotional to the current article. See the section on Devotionals.
erasmus online
Tapping this item opens a dialog with various online options. The dialog looks like this:
Free library upgrade
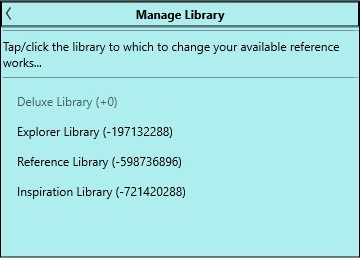
Tapping this item opens a dialog that allows you to download a different library than what you have installed. The dialog resembles this:

Each library option is listed, showing how much additional space is needed or freed up. A negative number indicates how much space would be freed up. A positive number indicates how much additional space is required). Tapping on a library will cause that library to be downloaded.
Note that various factors outside of the control of erasmus may sometimes result in the amount of space savings or usage being different than what the dialog lists.
Prayer Journal
Tapping this item opens a dialog that allows you to download a different library than what you have installed. See the section on the Prayer Journal for more information.
Memorization
Tapping this item opens the Bible memorization tool, which helps you memorize Bible verses. See the section on Memorization for more information.
Help
If you have the Deluxe library, tapping this item opens a tab containing help about erasmus. If you have a smaller library, a browser is opened to the online documentation.
OUTLINE:3,About erasmus
About
Tapping this item opens the About box for erasmus. This contains information on the version of erasmus that you are running, and a button that you can click to check for updates for the app.
The tab bar only shows if you are viewing a reference work. It resembles the following:

1. This is a tab. Each time you open a reference, a new tab is created. The tab contains the abbreviated name of the reference work, the reference that is visible at the top of the text area, and a close button.
2. Tab options. The circle contains the number of open tabs. If there are more tabs open than can fit on the tab bar, only the most recently viewed ones are shown. This number indicates the total tabs open, even if they are not visible on the tab bar. Tapping this will show the tab options drop-down, which includes a list of all open tabs. You can then tap a tab in the list to bring that tab back to the tab bar (probably causing another existing one to no longer be visible). Generally, you should close a tab when you are done with it. The more tabs that you have open at a time, the harder it will be to find it in the long list in the drop-down. Also, erasmus will start up more slowly if there are a lot of open tabs.
If you have multiple visible tabs, you can switch between them by tapping on the tab you wish to view. The tab associated with the visible text is the "active tab" and has a blue outline to help you see which of the tabs is the active one. If you tap on a nonactive tab, that tab will become active. If you tab on an active tab, the behavior will depend upon which item in the tab that you tap: If you tap on the reference work name, you can change which reference work to view. If you tap on the reference, you can change where you are in the current reference work. If you tap on the close button, the tab will be closed. Note that you can close even an inactive tab by clicking on the close button.
Tab bar drop-down
This drop-down menu allows you to perform actions on the currently visible tab. Which options are visible depends upon the reference work you have open. The following are all the possible options with descriptions of the situations in which they occur. Unless otherwise noted, once you tap one of the options, the drop-down will vanish. It will also vanish if you tap the tab options again, or tap anywhere else in the app. The drop-down resembles the following:

Add a pane. This allows you to add another pane to the current tab, allowing you to view multiple Bibles, Topical articles, or Lexicons side by side. Up to eight panes can be added, and the option will be absent if there are already eight panes showing. This option is not visible in a parallel passage tab. See the discussion of Multipane Tabs for detailed information. Note that the drop-down menu will not close when you tap this, so that you can easily add multiple panes.
Remove a pane. This allows you to remove a pane from a multipane tab. The last pane added will be the first removed. This option will not be present if the tab is not a multipane tab. See the discussion of Multipane Tabs for detailed information. Note that the drop-down menu will not close when you tap this, so that you can easily remove multiple panes.
Parallel passages. This allows you to convert a tab to a parallel passage tab. It shows when you are viewing a verse that has one or more parallel passages. A parallel passage tab shows four panes, which can show up to four passages side by side. All panes are from the same reference work. If there are fewer than four parallel passages for a given verse, one or two of the panes will be empty. The parallel passage shown is based on the top verse in the leftmost pane. Each pane caption with parallel passages will show the book name where the passage is found. The pane caption will be blank if there is no parallel passage. To indicate the presence of parallel passages, verses in the leftmost (or only) pane will have the parallel passages image next to the verse number. If you tap on that image in a multipane tab, a new tab will open to a parallel tab for that verse. Otherwise, the current tab will convert to a parallel view.
Close all tabs. This will close all open tabs, whether currently visible or not. You will be prompted.
Show highlights panel. This will show a highlights panel at the top of the tab. This option only shows if a highlights panel is not already visible and the tab is showing Bible text. See the section on Highlights for detailed information on highlights.
Opens a new tab to a commentary on the current verse.
Opens a new tab to a Bible on the current verse.
Hide highlights panel. This will hide a highlights panel. This option only shows if a highlights panel is visible in this tab. See the section on Highlights for detailed information on highlights.
Tab list. After the above options comes a list of all open tabs. You can tap one of these to focus the tab. You can also drag the tab off to the right to close it.
When you tap on text that shows in a tab, one of two things happens. If the text is part of a reference (such as a verse reference), an Information popup will be displayed (see below). For other text, a general popup menu will show up at the point where you tapped. It looks similar to this:
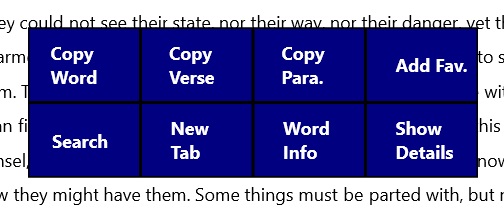
Which options are available/enabled depends upon what text you tap on.
Copy Word. Tapping this button will copy the tapped word to the clipboard.
Copy Verse. Only available in Bible text. Tapping this button will copy the tapped verse to the clipboard.
Copy Para. Tapping this button will copy the tapped paragraph to the clipboard.
Search. Performs a search on the word you tapped.
New Tab. Opens a new tab to the current reference work/position.
Word Info. Shows a definition of the word that was tapped. This may not work on words from languages other than English, Greek, and Hebrew. Also, it may not be available for all person or place names. Note that some reference works may have incorrect spellings or transliterations of some words which the app will not recognize.
When a reference is tapped in text, the Information Popup is shown. It resembles the following:
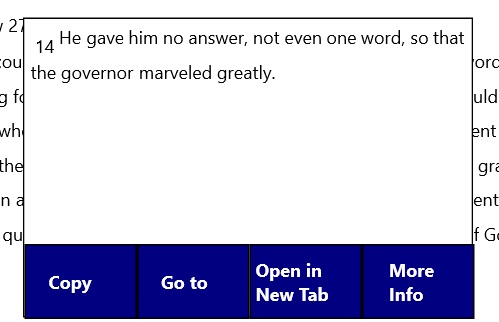
The text area shows the text of the reference from the default Bible/encyclopedia/Lexicon.
Copy. Tapping this button copies the shown text to the clipboard.
Go to. Tapping this button will move to this reference in the current tab. If the current reference work does not have this reference (such as tapping a verse reference within an encyclopedia), the reference is opened in a new tab.
Open in New Tab. Tapping this button opens a new tab to the shown reference.
More Info. Shows information related to the shown reference. Depending upon which type of information was tapped, the contents of the dialog will vary. For a verse reference, the dialog will resemble the following:
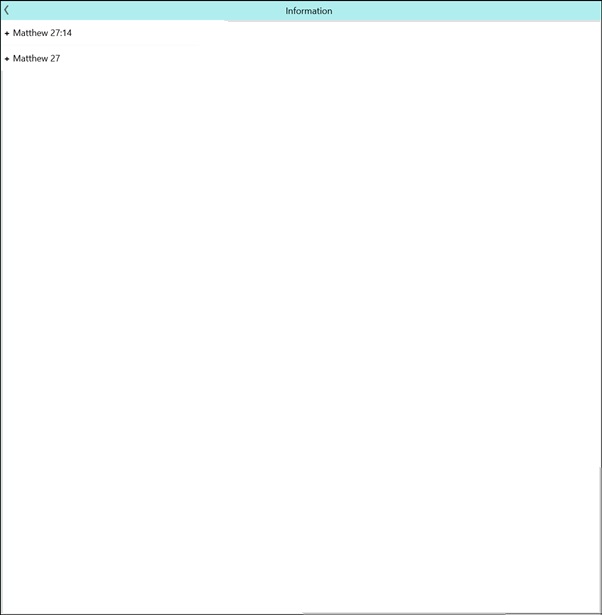
In this case, there are two items: the specific verse and the chapter containing the verse. To see more information on the verse, expand the first item by tapping the plus (+). To see more information on all verses in the chapter, expand the second item. As an example of expanded items, the dialog would resemble:
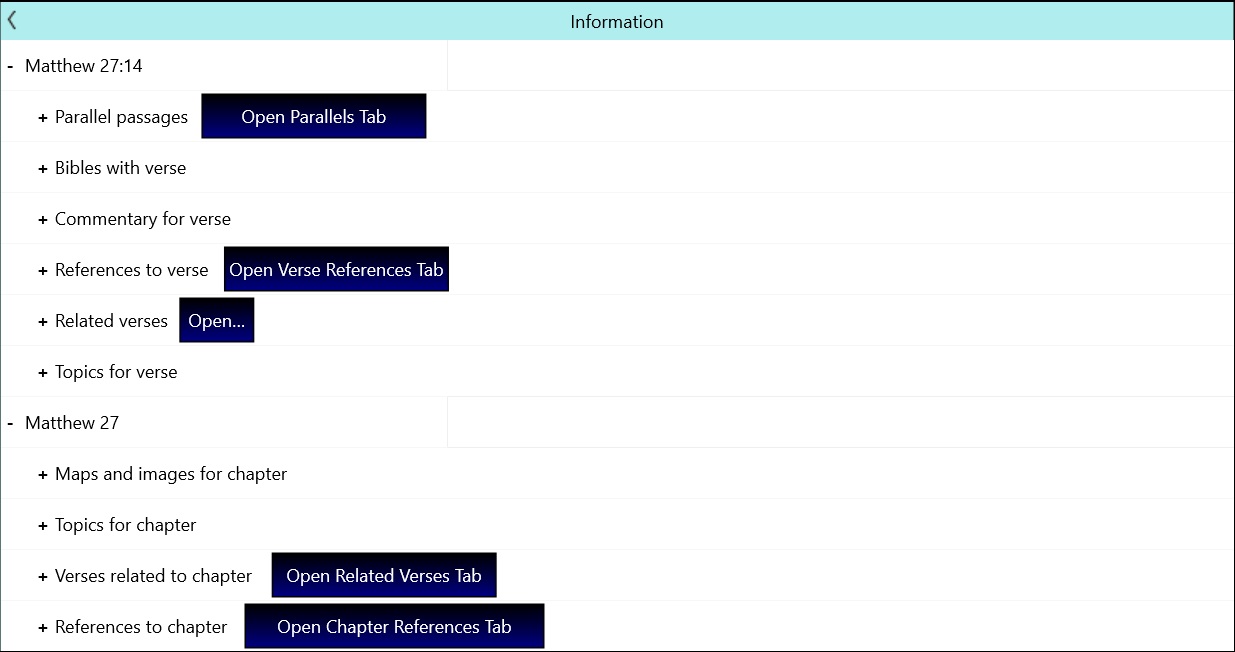
Which options are shown depend upon the reference and/or reference work. For instance, Parallel passages will not be shown if the verse has no parallel passages, or if the reference is a topic, etc.
Parallel passages. If the current verse has parallel passages, you can expand the item to see the parallel passage references, or you can click the button to open a tab to this verse and its parallel passages.
Bibles with verse. When expanded, all Bibles that have this verse are shown. Tapping on one of them will open a new tab to this reference in that Bible.
Commentary for verse. When expanded, all commentaries that comment on this verse are shown. Tapping on one of them will open a new tab to that commentary at this verse.
References to verse. When expanded, all works that have a reference to this verse are shown. Tapping on one of them will open a new tab to that reference in the tapped work. Tapping the button will open a new tab with a search pane showing all references to the verse.
Related verses. When expanded, all verses related to this verse are shown. Tapping one of them will open a tab to that verse. Tapping the button will open a new tab with a search pane containing all related verses.
Topics for verse. When expanded, all topics associated with the verse are shown. Tapping one of them will open a new tab to the topic.
Maps and images for chapter. When expanded, all maps and images associated with this verse are shown. Tapping one of them will open a new tab to that map or image.
Topics for chapter. When expanded, all topics related to any verse in the chapter are shown. Tapping one of them will open a new tab to that topic.
Verses related to chapter. When expanded, all verses related to all verses in the chapter are shown. Tapping one of them will open a new tab to that verse. Tapping the button will open a new tab with a search pane containing all there related verses.
References to chapter. When expanded, all places referencing the whole chapter, or any verse in the chapter, are shown. Tapping one of them will open a new tab to that verse. Tapping the button will open a new tab with a search pane containing all the references to the chapter.
There are three main ways to open a reference work. The first way is by entering a reference in the search box. The first reference work found with the specified reference is the one opened. The order in which the reference works are processed can be set by the user. See the section on Preferred Reference works for information on this. However, the reference work can be specified as well by using the reference work name or abbreviation, a colon (:), and the reference. For instance, typing "WEB:Romans 10:10" would open the World English Bible to Romans 10:10.
The second way to open a reference work is to use the Library dialog. Tap on the Main Options menu in the upper right corner of the app, and tap on "Library". This will bring up the library dialog, which resembles this:

You can tap the button corresponding to what you want to open.
Bibles. Tap this button to see an alphabetical list of all available Bibles. Tap the Bible you want to open.
Categories. Tap this button to see a list of all reference works, grouped by category (Bibles, Commentaries, Lexicons, etc). Tap the reference work that you want to open.
Titles. Tap this button to see a list of all reference works, sorted by title. Tap the reference work that you want to open.
Authors. Tap this button to see a list of all reference works, sorted by author. Tap the reference work that you want to open.
Lists. Tap this button to see all lists that you created. You can tap the list you want to open. This will create a new tab with a list pane on the left. See the section on Lists.
Plans. Tap this button to see a list of all Bible Reading Plans. See the section on Bible Reading Plans.
When you open a reference work via the Library dialog, the reference work is opened to the title page of that reference work.
The third means of opening a reference work is by tapping on a reference or reference work in the "More Information" dialog.
Once a tab opens, you will see the text of that reference work in the Reference Work text area.
Once a tab is open, you can move around within the reference work. Scrolling is the most obvious way. However, you can also quickly move to a specific location by tapping on the reference in the tab. This will open the Reference dialog and allow you to enter, or choose, a new reference. The Reference dialog resembles the following:

A new reference can be entered into the top reference box, or an option can be chosen from below. Depending upon the reference work, different things are displayed. In this example, the reference work can be navigated by book/chapter/verse (Bible) or by book outline (Outline). Tap the desired method and then choose the new location from what is shown. This will place the reference in the box, and the Go button can be tapped to change the reference work to that location. Tapping Go does nothing if the reference in the box is not valid for the reference work.
Depending on the contents of the reference work, there can be options for topics, Strong's numbers, etc.
If you tap on the reference work name abbreviation in the tab, a drop-down of reference works is shown. Only those reference works which have the currently displayed reference are shown. Tapping on one of those names will cross-reference to the current reference in the tapped reference work.
Note that generally, only reference works in the same category as the current reference work are shown. That is, commentaries are not shown in a list of Bibles, or vice versa. When viewing a general book, you will see no other books, because there is no common reference between books that don't have Bible/Chapter/Verse, Topics, or Strong's Numbers.
Tabs for Bibles, Commentaries, Encyclopedias, and Lexicons have the capability of showing up to eight different reference works at once. Each reference work is shown in a separate pane in the tab. The Tab options drop-down menu allows you to add or remove panes from the tab. When removing panes, the most recently added pane is the first removed. The reference work associated with a newly added pane is determined by the order you have selected for that type of reference work. See the section on Main Options for more information.
The original pane (which will be the upper left pane if there are multiple panes) is the main pane, which means that the tab reference, reference work, and scrollbar will affect that pane. As the location of the main pane is changed, the other panes are adjusted so that the top paragraph in each pane contains the first verse/topic/word that occurs in the top paragraph of the main pane. Therefore, if the main pane displays text for a Bible which has several verses in the top paragraph, so long as that paragraph is the topmost visible paragraph, any scrolling operation in the main pane causes the subsidiary panes to reset the top paragraph to that verse. You can, however, individually scroll subsidiary panes by dragging them up or down. However, as soon as any change happens in the main pane, the subsidiary panes will once again update to match the main pane.
Each subsidiary pane has a caption that shows the abbreviated name of the reference work which is showing in that pane, you can tap that caption to see a list of other references of the type. By tapping the name, the pane will change to that reference work. If another subsidiary pane is currently showing that reference work, the panes are effectively swapped. This will also update your Preferred Reference works for that type of reference work.
A Bible reading plan is a schedule for reading through the Bible (in whole or in part). The erasmus Bible app provides the means for you to generate your own custom plan for reading the Bible. To open an existing plan, tap the main options button, tap "Library", tap the "Plans" button, and then tap the plan you wish to open. See the section on Opening a plan, below, for more information.
To create a plan, tap the main options button, then tap "Bible Reading Plan". The following Bible Reading Plan list opens:

Existing plans are shown on the left. On the right are buttons that allow you to create, delete, rename, edit, or open a plan.
Tapping this button creates a new reading plan. erasmus creates a unique name which you can change. It also brings up the plan editor so you can customize your plan. See the section on editing below.
Tapping this button deletes the selected plan.
Tapping this button allows you to edit the name of the selected plan.
Tapping this button allows you to modify the selected plan. The dialog resembles the following:

The left side contains checkboxes for each Bible book, in an outline form. Only books that are checked are included in the plan. On the right you can specify how many days you want to allot to reading through the checked books. For instance, if you check "Entire Bible" and set the number of days to 365, the plan will take you through the entire bible in one year.
When you tap the Save button, your customized plan will be saved. The total number of chapters is divided by the number of days to let you know how many chapters to read each day of the period you selected. Plans include all chapters from the checked books (no partial books can be specified) and each day's reading will include entire chapters.
Tapping this button opens the selected Bible Reading plan. This opens the selected plan in a new tab. The plan will look like this:

On the left is the plan pane which shows each day and which chapter(s) to read on that day. To read the chapter(s) indicated, click on the reference, which will open that text on the right side. When you have finished the reading for one day, you can check the box to indicate that fact.
Tapping on the caption for the left plan pane will open the Bible Reading plan dialog.
Lists are named collections of references that you can create and modify for your own uses. Some lists are created by erasmus on your behalf. For instance, when you highlight a verse, that verse is added to the "Highlights" list. When you search for text, erasmus creates a temporary list containing the search results. These temporary lists are deleted when the associated tab is closed.
A list that comes installed with erasmus is the "Default favorites" list. This list cannot be deleted or modified, but a copy of it can be made, and that copy can be modified or deleted. In the list of lists, this default list is shown as "<default favorites>" to distinguish it from your own lists.
New lists are created manually or by copying existing lists, such as search results. They can also be created from internal topic lists (See the section on Highlights). The name of a list may contain any characters except "<". Note that all leading and trailing spaces are ignored in the name.
The Manage Lists box is used to manage your lists. On the left side are the names of the existing lists. On the right side are the buttons which allow one to perform various options on lists. Tapping a list on the left will select that list and allow you to perform operations on that list. The buttons will be enabled or disabled as appropriate depending upon which list is selected. The
dialog resembles this:

Add new list
When this button is tapped, a new empty list is created and added to the names on the left. The name is defaulted and you can change it to be the name you want (or you can leave it as is).
Delete
When this button is tapped, the currently selected list is deleted. You will be prompted to confirm the deletion.
Rename
When this button is tapped, the selected list's name can be edited.
Edit
When this button is tapped, the list editor is shown. Here the list can be manually edited. The editor looks like this:

On the left side of the editor is the list of references in the list being edited.
The references on the left can be qualified or unqualified. Qualified references are those that are for a specific reference work. They are preceded by an abbreviation for the reference work. For instance "KJV Gen 1:1" is a qualified reference to Genesis 1:1 in the King James version, whereas "Gen 1:1" is an unqualified reference to Genesis 1:1 in general. The right side has buttons that allow the list to be edited. The buttons that are enabled depend on what, if anything, is selected on the left. Above the buttons is the reference box where a reference can be typed.
Add
Entering text into the reference box enables this button. When tapped, the reference in the reference box is added to the list.
Delete
Tapping this button deletes the selected reference on the left.
Copy
Tapping this button copies the selected reference to the clipboard.
Copy List
Tapping this button copies the entire list to the clipboard.
Unqualify
When this button is tapped, the list is modified so that reference works are removed from references for bible verses, Strong's numbers, and topics.
Consolidate
When this button is tapped, the list is consolidated. This means that duplicate
references are removed.
Sort
When this button is tapped, the list is sorted. If the list contains multiple types of references (such as topic and verses), the sorted list will have the types sorted separately and gathered together.
Duplicate
When this button is tapped, the a new list is created that is a duplicated of the selected button. A name for the new list is created, which you can alter as desired.
Merge
When this button is tapped, existing lists are shown and you can tap one of them to merge the selected list into. The lists will be merged and the old list is deleted.
Open
When this button is tapped, the selected list is opened.
There are two ways to open a list:
1. Tap the Main Options Button, then tap "Manage Lists". Tap the desired list on the left, then tap the "Open" button on the right.
2. Tap the Main Options button, then tap "Library", then tap "Lists".
You are shown all the current lists and you can tap the one to open in a new tab.
Once you open a list, a tab will open. In the tab there is a left reference pane that contains the references from the list, and the right text area that shows the text for the selected reference. It looks similar to this:

The erasmus Bible app allows a fair amount of customization. You can see options by tapping the Main Options button in the upper right corner of the app. Tap "Preferred Reference works" to set preferences related to reference works. Tap "Options" from the drop-down to open the Options dialog for other customizations. Certain features also offer preferences when they are used (such as Highlights). See the section on Program Options for a detailed discussion of the Options dialog and the customizations it offers.
Some options are unique to certain platforms, so you may not see all of the possible options in your dialogs, drop downs, etc.
This option dialog is chosen from the Main Options drop-down rather than from the Options dialog. First it asks which category of reference work you wish to reorder. It will only show categories that contain two or more reference works that are available to you. Thus, this list will vary depending upon which library you are using and what add-ons you have purchased. A full list might look like this:

Once you select a category, erasmus brings up a list of all the reference works in that category, in a dialog resembling this:

This list is in the current order of reference works for that category. If you tap the down-arrow next to a reference work name, that reference work is moved down in the list (that is, after the reference work directly beneath it). If you tap the up-arrow next to a reference work name, that reference work is moved up in the list (that is, above the reference work directly above it). When you have the reference works in the desired order, you can exit the dialog. From now on, when you open a reference for that category, the list is searched from top to bottom until the first reference work with that reference is found; that is the one that is open.
Preferred Reference works also defines which reference works are opened when adding panes to a tab.
Devotionals are reference works which offer material for encouragement and exhortation. Some devotionals are included with the Reference library (and larger). Each devotional is designed to provide readings on a regular basis - usually daily. For devotionals with a pre-defined reading schedule, erasmus will open it to the article for the current day and time. For devotionals without such schedules, it is opened to a random location.
Note that opening a devotional from the Library dialog will open it like any other general book - to the title page. Devotionals opened via the "Open devotional" item in the Main Options drop-down will automatically update to the proper place when erasmus starts - or when the date or time changes to match a different part of the devotional's schedule. But devotionals opened via the Library dialog do not automatically update to different locations. Also, devotionals with random schedules only open to a new location when erasmus starts.
To search for specific text, start the text with a quote ("). For example:
"fruit
If the quotes are left off, erasmus will look for articles on the topic "fruit". Or to search for "Genesis 1", you would need quotes to search for that text, or else erasmus would open the default Bible to Genesis 1:1. You can leave off the ending quote, if you wish. And if you enter text that is not a recognized topic name, verse reference, or original language word reference, what is entered will be searched for as text.
Note that if your search results in more than 5,000 matches, you will be informed and a tab is not opened. Searches with that many results (or more) are generally not helpful for study. Also, if the text is not found, erasmus will inform you of this.
Searches are always done on the reference work that is visible in the current tab. If no tabs are open, the search is done in the default Bible. If the current tab has multiple text panes, the search is done in the primary text pane. If you want to search in a different reference work, or to search several reference works at a time, use the Advanced Search dialog.
Note that you can do a search for a phrase instead of one or more words. This is done by starting the search text with two quotes ("") instead of one; the first quote indicates a text search and the second quote starts a phrase. Note that phrase searches take longer than word searches. Example:
""god said"
Note that without the starting double quote, every paragraph that contains both words is shown, even if the words are not next to each other or in the order you specify. Example:
"god said
When a search is done, a new tab is opened, with the search results shown on the left search pane, and the text opened to the first result on the right. Searches never change an existing tab into a search results tab. A search tab resembles the following:

Tapping on the caption above the results allows you to create a list from the results, or otherwise manage lists. The options are:
o Manage lists: open the List dialog. See the section on Lists.
o Add to new list: A new list is created and the results are added to that list.
o Merge into list: Tap one of the lists below this to add the results to that list.
On platforms with a keyboard (Mac and Windows), pressing F3 will highlight the next item in the search pane as if you tapped it. Pressing Shift+F3 will highlight the previous item in the search pane as if you tapped it.
The Advanced Search dialog allows a more flexible search than what can be done in the main Reference/search box. This is opened from the Main Options button dropdown, and tapping the "Advanced search" item, which opens a dialog resembling the following:

The search box at the top is where the text to search for is entered. There is no requirement for quotes, since this only does text search - it will not open a topic, word, or verse reference.
Below the box is the language selection where you can specify which language you wish to search. Only words in the specified language are included in the search results. Neither Greek nor Hebrew are included in the list of languages. These will be searchable in a future version.
At the bottom is an outline of all available reference works. They are grouped by category and the dialog allows you to easily include or exclude entire categories. Note that the more reference works that are included, the more likely you are to exceed the maximum of 5,000 results. All reference works with checks are included in the search. If this maximum is reached or no matches are found, erasmus informs you of this. Otherwise, a tab is opened with the search results on the left and the text for the selected reference on the right.
Since advanced search only searches text, an initial quote is not required - any use of quotes indicates a phrase search.
You can sign up for a free erasmus account if you are 13 years old or older. The purpose of an account is to allow you to purchase reference work add-ons when they become available. Some other features may also be available to logged-in users in the future, such as surveys. For now, if you haven't purchased any add-ons, having an account provides you with no benefit.
To protect authors from people stealing their material, you are not allowed to access purchased add-ons from multiple locations at the same time. Location is determined by your internet address. This will be the same for all people using the same wi-fi device, so people in such a household can simultaneously access purchased content. However, if you are using a mobile phone through the phone's network instead of your wi-fi device, that will be considered a separate internet address.
When devices at two different locations try to access an account with purchased materials, one of them will not be allowed. The first to log in will have sole access for about 10 minutes. After that period, another device can obtain access and prevent the first device from accessing it until another 10 minutes pass. Thus, in a given 10-minute period, devices at only one location can access that material. However, if the currently active device signs out, other devices can access the content. Choosing the Refresh Account option from the account drop-down menu will attempt to acquire access to the account content in less than 10 minutes if the account is not signed in on a device in another location.
In all cases, however, you can always access the free content that comes with erasmus.
Colorized Bibles are a feature of erasmus that allows you to view Bibles with verses highlighted with specific colors associated with chosen topics. Control of these highlights is described below in the section on Highlights. Unlike colorized print Bibles, erasmus allows you to choose which topics to highlight and which colors to use for those topics.
Bible verses can be highlighted with specific colors. This is controlled with the highlights panel. This panel is available only for Bibles and can be shown or hidden by selecting the corresponding option from the Tab Options drop-down. It will show above the text in the tab. erasmus supports multiple simultaneous highlight sets. Highlight sets can be topical highlights or list highlights. The standard highlight set is the "highlights" list and is a default empty list. It defaults to yellow and is the only active highlight set when you first run erasmus. Active highlights are those whose backgrounds will be shown when the appropriate verse(s) are visible in the text.
The highlights panel has two or more boxes with names to the right of the boxes. The standard boxes are shown on the left. Right of that are the highlight sets that are active. Only one box can be selected at a time. Selected boxes are outlined in red. Unselected boxes are outlined in black. Note that the highlights being shown are those on the panel, regardless of whether or not they are selected. The boxes are described below.
Because multiple highlights can apply to a given verse, if multiple highlights are active, erasmus chooses the highlight that is farthest left in the highlights panel. That is, in the case of conflicts, the highlight farthest to the left that corresponds to the verse is the one that is shown. You can adjust the priority (order) of highlights by tapping on the down arrow on the far left of the panel to bring up the highlights option dialog. You can also add or remove highlights using this dialog.
Highlight sets are of two types: topic and list. Topic highlights are pre-defined lists of verses that correspond to the topic. The list contents cannot be changed, however you can combine a topic and its subtopics into a single color. These combined topic highlights are shown with an ellipse (...) following the topic name. List highlights are highlights that are based on a list created by the user. See the section on Lists for details on creating, deleting, and modifying lists. A List highlight set is shown on the panel just as are topic highlights except that the name is prefixed with an asterisk (*) to indicate that it is a list.
Because topic highlight sets are not changeable, if you attempt to clear or set a highlight for one, the topic highlight set is not altered. However, erasmus will create a list of the same name of the topic (if there isn't one already), and the list will take the place of the topic set in the highlights panel. If the list didn't exist before, the topic list is copied to the new list. This is, in fact, a quick way to create a list from a topic list.
The highlights panel has two or more boxes with names to the right of the boxes. The standard boxes are shown on the left. Right of that are the highlight sets that are active. Only one box can be selected at a time. Selected boxes are outlined in red. Unselected boxes are outlined in black. Note that the highlights being shown are those on the panel, regardless of whether or not they are selected. The highlights panel resembles the following:

When tapped, the Highlights options dialog is shown.
When selected, erasmus works as normal when you tap in the text. That is, the appropriate popup is displayed over the text.
When selected, taps in the text will remove whatever highlight is being shown (nothing happens if the verse has no highlight).
These are the active highlights. Tapping the box next to a highlight name will select that highlight as the current highlight. Tapping on a verse thereafter will apply the highlight to that verse. If the highlight is already associated with that verse, nothing changes.
When a highlight set is selected, any clicks on a verse will highlight the verse with the color associated with that highlight set.
This dialog is shown when you press the black triangle on the far left of the Highlights panel. It allows you to alter which Highlight sets are active and associate a color with them. The dialog resembles the following:

The dialog is split into a top and bottom half. The top half lists all topics and lists that are active. The bottom lists all topics and lists that have not been assigned a color and are, therefore, inactive. As in the Highlights panel, lists are preceded with an asterisk (*), while topics are not.
At the top of the unassigned topics/lists is an edit box where you can type the name of a topic to scroll immediately to it. Clicking on an unassigned topic or list will bring up the color dialog which will allow you to select the color that you wish to assign to the topic/list. The Color selection dialog resembles the following:

Any colors already in use in a highlight set have a red border instead of black. You can assign the same color to multiple topics, but it will then be impossible to tell which topic is causing a verse to have that color highlight. If you choose a topic that has subtopics, a checkbox will appear at the bottom of the color dialog. Checking it will include all subtopics along with the topic in the highlight set. Tap the box before choosing a color.
The highlight sets shown in the upper half are shown top to bottom in the order they are on the highlights panel from left to right. Whereas the Highlights panel may be too narrow for you to see all highlight sets lists, all active highlights will be shown in the upper half, although scrolling the list may be necessary. The color associated with the highlight set is shown to the right of the highlight name. Tapping a topic or list in the upper box will bring up a dialog box that will allow you to alter that highlight set. The dialog resembles the following:

Assign New Color
Tapping this button will bring up the color dialog so that you can choose a different color to associate with the highlight set. The color dialog resembles the following:
Move Topic to Foreground
Tapping this button will move the topic/list to the top of the list (to the left of the highlights panel), which means it will take precedence over any other highlight sets.
Remove Topic Highlight
Tapping this button will remove the selected highlight set. It will be inactive and the color will no longer be associated with it.
Audio content, included with the erasmus Hymnal (Explorer library and up), is heard by tapping the notes icon associated with a particular song or other audio. Doing so will display the audio control panel at the bottom of the text display. It contains several items and resembles the following:

On the far left is the close button which will hide the audio control panel if tapped.
This shows the current time index in the audio.
Pressing this button will start or stop the playing of the audio.
Goes back to the start of the audio.
This is the name of the tune that is playing. Tapping on this will show a list of tunes whose meter match this song. Tapping on a tune name will switch the playing tune to that one.
You can choose Options from the main options drop-down menu to change your preferences for how erasmus operates.
Some options may not display depending upon which reference works you have access to, what type of text is being viewed, and the platform on which you are running erasmus. One or more of the following tabs will be shown in the Options dialog.
Text Size
This tab allows you to change the default text size. You can drag the thumb left or right on the bar to decrease or increase the text size. Tapping the default button will return the text size to the original size when erasmus was installed.

Hover
This tab only appears on Windows and Mac. It allows you to control the hover popup. You can drag the thumb left or right to adjust the delay before a hover popup with appear. For hover to appear, you must leave your mouse pointer unmoved for the indicated number of seconds. You can also completely disable hover by tapping the checkbox at the bottom. Tapping the Default button returns the hover settings to the original values.

Devotions
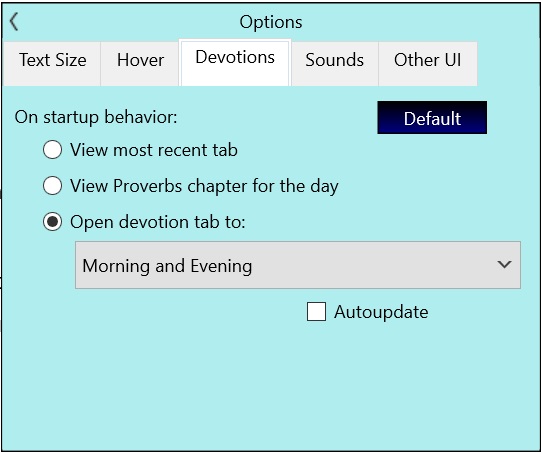
This tab only appears if you have devotional reference works. You can select one of the following behaviors when erasmus starts:
1. View most recent tab. Ignores devotions and simply opens the tabs you had open when you last ran erasmus.
2. View Proverbs chapter for the day. A Bible tab will automatically open to the Proverbs chapter corresponding to the current day of the month.
3. Open devotion tab to. If checked, when erasmus starts, a tab is opened to the devotional that is selected in the list.
If the Autoupdate checkbox is checked, the devotion tab will automatically update when the day changes.
Sounds
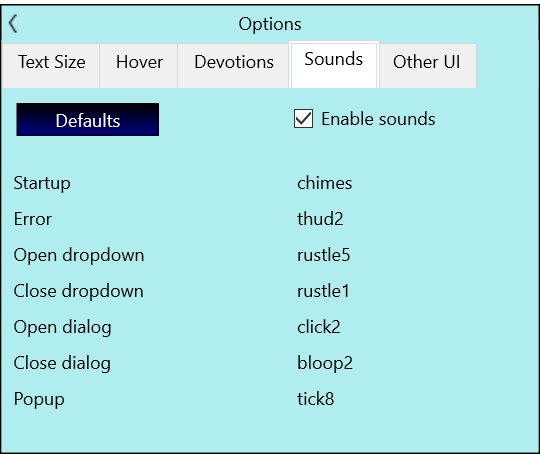
This tab allows you to control sound effects. If the Enable sounds checkbox is not checked, no sounds are used. Otherwise, the sounds on the right are used for the operations on the left. If you tap on one of the sounds, the sound selection dialog is shown where you can choose which sound effect you want to associate with the operation.
Note that disabling sounds does not affect the operation of the hymnal.
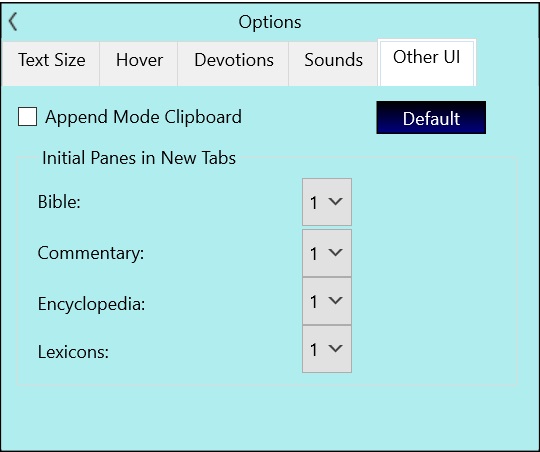
Other UI
This tab allows you to change various options. You can set the clipboard append mode. When Append mode is checked, each clipboard text copy operation is added to the existing contents of the clipboard. This allows you to quickly collect several items on the clipboard. If unchecked, the clipboard operates as normal - that is, any copy operation replaces the existing clipboard contents.
For Bibles, Commentaries, Encyclopedias, and Lexicons, you can define the number of initial panes to open for that type of text. If more than 1, when a tab is opened to the specific type of text, a number of add-pane operations are done to bring up the number of panes to match what is desired.
Pressing the Default button will reset all of these settings to the original erasmus settings.
You can also control automated memorization tests here. If "Allow automated random testing" is checked, erasmus will randomly select a verse from your list of memorized verses and prompt you to enter it. This "pop quizzes" can help you recall memorized verses and verify that you can still quote them accurately.
"Minimum interval (minutes)" indicates the shortest period between tests so that you are not bothered by pop quizzes too often. The default is 15 minutes, but you can adjust the number of minutes up or down using the left and right arrows or tapping the number to enter a new value.
If "Random interval" is checked, some random amount of time is added to the minimum interval so that the pop ups are less predictable.
The Prayer Journal feature allows you to create a list of things to pray for on a regular basis.
erasmus allows you to create your own prayer lists or download prayer lists from web sites. The prayer items you add can be modified (edited) as desired. Downloaded lists can only be removed.
The prayer journal dialog has three tabs.
erasmus is an EPPJ compliant prayer journal client that can be used with any online EPPJ prayer list. You can also use erasmus to create a prayer list that can be uploaded for other people to download. This can be done by following these steps:
1. Create a new prayer list
2. Add prayer items to it via the Add Item button on the Manage tab.
3. When done, export your prayer list to a file via the Export button on the Manage tab. The file should be named "eppj.txt".
4. Upload the exported file to your web site.
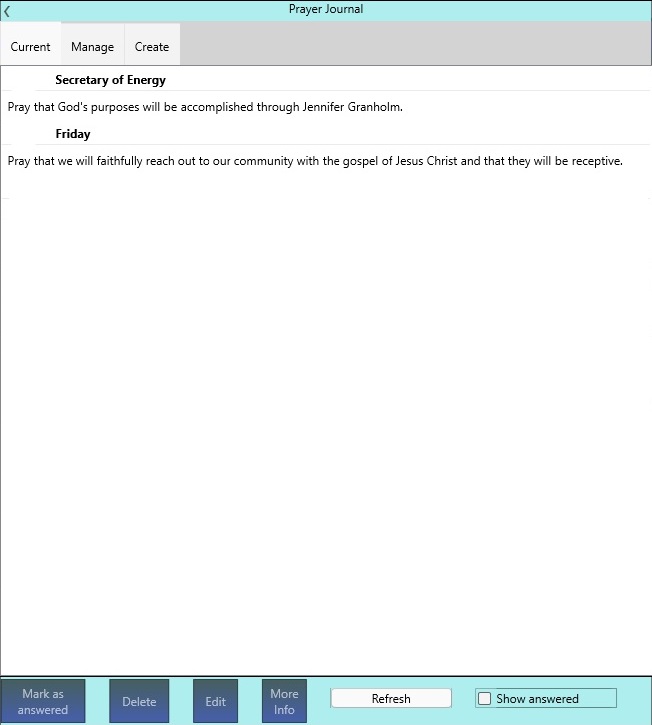
This tab shows the prayers for the current day from all of your prayer lists. This tab resembles the following:
Tapping on the white option button at the lower left will show a popup menu resembling the following:
Different options are shown depending on whether or not a prayer item is selected, and what prayer list the item is from. In the above example, the topmost prayer item is selected. Note that the only operation you can perform on an item from a downloaded prayer list is to delete it.
All of the possible options are described below.
Tapping this will mark the selected prayer as answered. You will be given a chance to indicate how/when the prayer was answered. If left blank, the prayer item is not marked as answered. You can use the Show Answered checkbox to indicate whether or not to show answered prayers. This is only allowed on prayers from your own prayer lists.
Tap this to delete the selected item.
Tap this to edit the selected item. Only prayers from your own prayer list can be edited. See the description of Editing a prayer item, below.
If the prayer item has additional information available, tapping this will bring up that information in your browser.
Tapping this will refresh the current list. This can be done if you believe a downloaded list has been changed since you started erasmus. When you start erasmus, it will automatically reconcile your downloaded lists with any online updates to those lists.
If tapped, the list will show answered prayers as well as unanswered ones.

If tapped, the list will not show answered prayers.
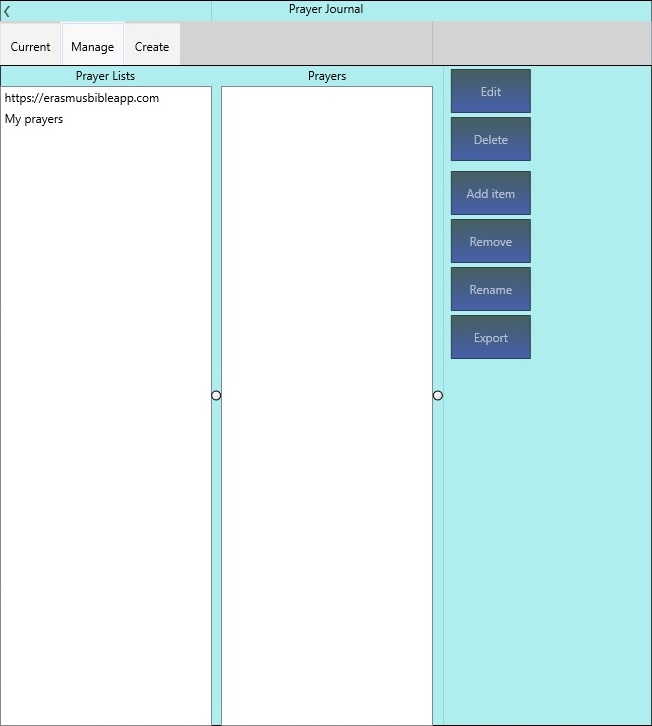
This tab allows you to manage your prayer lists.
Tapping this button will allow you to edit the selected prayer item. Note that you cannot edit an item from a downloaded prayer list. The Edit item dialog looks like this:
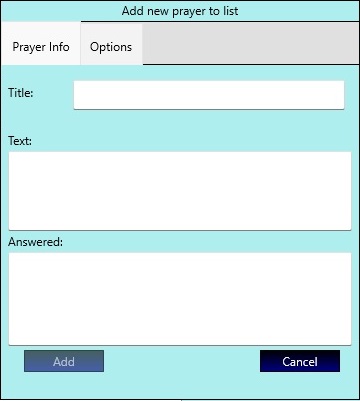
There are three tabs. The Prayer Info tab is sufficient for most purposes. Additional options are available by tapping the Options tab, described below. Online-related options are available by tapping the Online tab. The buttons are common to all tabs.
Add. Tap this button to create the new item in your prayer list.
Cancel. Tap this button to cancel the creation of a new item.
Prayer Info
Title. Required. Enter the title of your prayer item here. This should be concise. Though you can have duplicate titles in a prayer list, it is recommended that you use a unique title for each item. If there are duplicates, a yellow triangle and warning will be shown. The title cannot include HTML source (ie it must be plain text).
Text. Required. Enter the detail description of your prayer item here. If the HTML checkbox is checked on the Options tab, the text here will be interpreted as HTML source.
Answered. Optional. If the prayer has been answered, enter a description here, such as how and when the prayer was answered. If the HTML checkbox is checked on the Options tab, the text here will be interpreted as HTML source.
Options
When you tap the Options tab, the following appears:
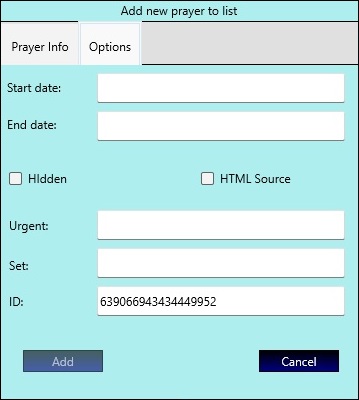
Start date. If you want this item to only be shown on certain dates, you can set the start and end dates. This can be a date specification of one of the two following forms:
YYYY/MM/DD
MM/DD/YYYY
Where YYYY is the year, MM is the month, and DD is the day. All of these must be valid numbers. Examples:
2025/2/28
12/25/2026
Note that you can substitute an asterisk (*) to indicate a wildcard on any one of these three numbers. For example, "12/25/*" would indicate Christmas day of every year, and "6/*/2025" would indicate every day of June, 2025.
Alternatively, you can use a weekday name to only show the prayer request on a specific day, such as "Wednesday". You can abbreviate the name, such as "Tue", so long as the abbreviation is unambiguous.
End date. If you want this item to only be shown on certain dates, you can set this to the last date for the item to be shown. This follows the same rules as the Start date (see above), but cannot be a day of the week or contain a wildcard. If the start date contains a wildcard or a week day, this should be left blank.
Hidden.
If checked, this prayer request is not shown.
HTML Source.
If checked, the text you enter for the Text, Answered, and Urgent boxes is treated as HTML source rather than plain text. HTML source can contain the standard HTML entities and the following tags:
<b>
<i>
<u>
<s>
Note: The title cannot include HTML source.
Urgent. If this is an urgent prayer request, enter a description as to that fact. Urgent items will have a graphic included when shown. If the HTML checkbox is checked on the Options tab, the text here will be interpreted as HTML source.
Set.
If you wish to have a set of prayer requests that are automatically iterated over, one at a time, you can assign them the same Set ID. For instance, if you have seven requests with the same Set ID, one request will be shown each day of the week. If there are fourteen requests, the request would be seen once every other week. A single request for a Set ID would be equivalent to having no Set ID - it would should every day. You can have multiple sets in a single prayer list, so long as the set IDs are different and the corresponding prayer requests have the ID of the set they belong to.
ID.
Each prayer item should include a unique ID. erasmus will automatically put a unique ID in this box for you and there should be no reason to alter it under normal circumstances. If blank, or the ID duplicates another item in the same prayer list, a red triangle and error will be shown.
Online
When you tap the Online tab, the following appears:
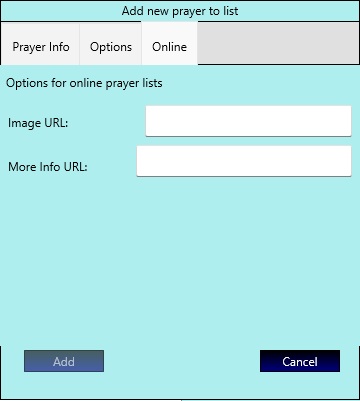
These options are for use when creating online prayer lists. The items are as follows:
Image URL.
This is the URL of an image that will be shown along with the prayer item text. If empty, or the image is not present, no image will be shown.
More Info URL.
This is the URL with more information that the user will be directed to if they request more information for this prayer item.
Delete
Tapping this button will delete the selected prayer item.
Add item
Tapping this button will add a new prayer item to the selected prayer list. See the description of the Edit operation above for details.
Remove
Tapping this button will remove the selected prayer list. If the prayer list is downloaded, this will remove it from your system, but you can always download it again. If the prayer list is one you created, it will be permanently deleted.
Rename
Tapping this button will allow you to rename the selected prayer list.
Export
Tapping this button will allow you to export the selected prayer list by bringing up the Export destination dia. The dialog resembles the following:
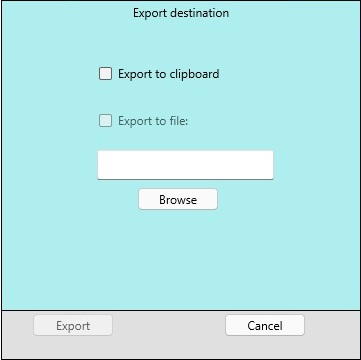
You can export your prayer list to a file, to the clipboard, or to both at the same time.
Export to clipboard. If checked, the prayer list is exported to the clipboard. Note that the appendable clipboard does not apply to this operation. If used, the previous contents of the clipboard are erased.
Export to file. If checked and a file name is specified in the box below it, the prayer list is saved to a file.
Browse. Tapping this button brings up a file dialog that allows you to choose a file from a folder to export to.
Export. Tapping this button will perform the export.
Cancel. Tapping this button will cancel the export operation.
Create tab
This tab allows you to create a new prayer list or download from a web site. The tab looks like this:
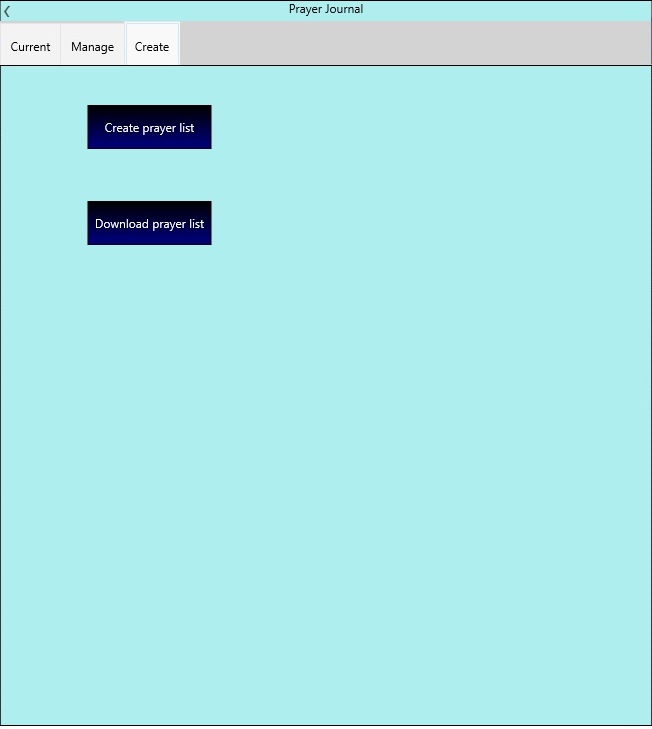
Tapping this button will create a new prayer list. First, it asks for a name:
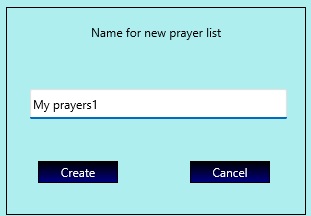
Once you specify a name, the item edit dialog is shown. See the Edit item dialog description above for details.
Tapping this button will prompt you for a URL address from which to download the prayer list:
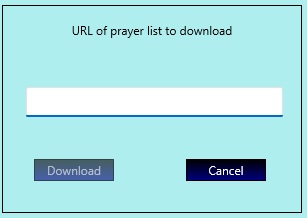
Once you provide a valid URL, the list will be downloaded and its prayer items will be added to those you see listed in the Current tab.
The Bible Memorization feature helps you to memorize Bible verses. You can create a list of memorization verses for your chosen Bible version and then use the tool to test yourself. You can also have erasmus randomly test you on your verses. See the UI Tab on the Options dialog to set up autotest. To open the Bible Memorization tool, choose
"Memorization" from the main menu. The Memorization tool will open, looking like this:
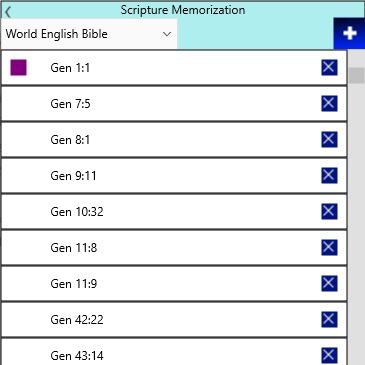
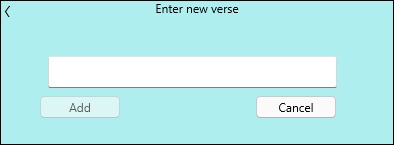
Each verse in your list of memorization verses is listed. You can change the Bible version in the upper left drop-down list. A verse can be removed by tapping the close button on the right. Pressing the plus button will prompt you for a verse to add to the list for the current Bible version with the following:
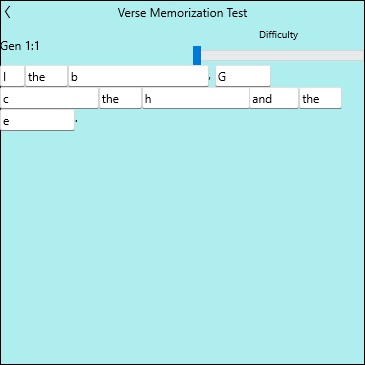
By tapping on a verse, you can bring up the verse test dialog. You can receive hints or enter the verse text in free-form. The first (highest) level of testing provides boxes for each word with some short words already filled in, and the rest of the words have the first letter shown. The difficulty level can be selected with the slider in the top right of the test dialog. The test dialog with the highest level of hints resembles the following:
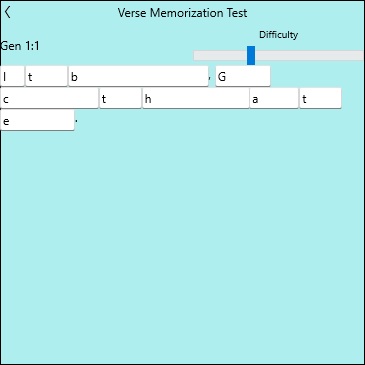
The next level of hinting doesn't show any words, but includes the first letter of each word. The test dialog resembles the following:
The next level of hinting shows only boxes for each word. The test dialog resembles the following:
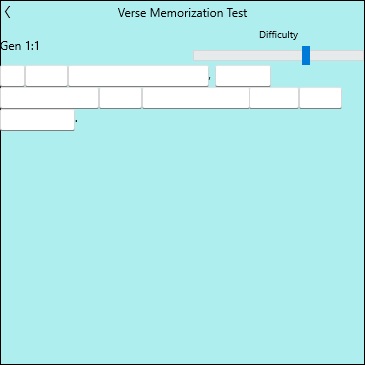
When typing in the boxes, each space or punctuation you type will automatically move you to the next box and check to see if the words you entered are correct. Thus, after entering the last word, press space again and the check will happen. If you got it correct, you will be told. If you get no confirmation, there is a mismatch somewhere. Double check your spelling if you think it is correct but get no notice.
The final level gives no hints at all. The test dialog then resembles the following:
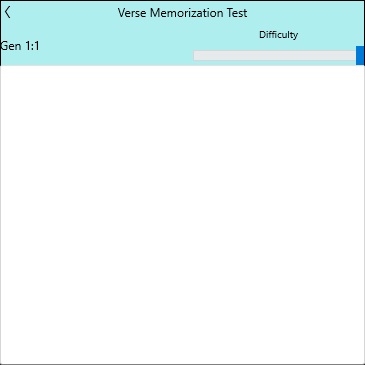
On each space typed, the correctness is checked. Note that punctuation is ignored, except for apostrophes inside words (like "Paul's").
On Mac and Windows, the mouse pointer can be moved over any reference and left there to bring up a "hover box". This is a box that shows up over the text and contains information about the text or image that the mouse pointer is over. Hover behavior can be adjusted in the Hover tab in the Program Options dialog. Hover windows can show under several circumstances:
1. Over a button: shows a short hint as to what the button does.
2. Over text or controls in a dialog: shows a short hint as to what the item does.
3. Over Bible, Strong's numbers, or topic references in text: shows the text of that reference.
When the mouse pointer is moved off of a hover, the hover box will vanish. You can also press the ESCape key to make the hover box vanish. The hover will appear again when you move the pointer over some other "hoverable" item and leave it there.
Another type of hover occurs when you drag the scrollbar thumb down through a reference work. A hover will show over the text indicating the corresponding location in the reference work. If the thumb is released at that point, the text will be positioned at the reference indicated on the hover. This hover window will go away once the thumb is released.
If you have a physical keyboard, it can be used to quickly perform certain actions. Most non-text keys that are not listed below have no effect if used. Here are the special keys:
General:
ESCape: Backs up one level in nested dialogs, closes a popup or dialog, cancels a hover window, or hides the menu on Windows.
Alt: Show menu on Windows.
Tab control:
F1: Open app Help.
F3: Select next item in search pane.
Shift + F3: Select previous item in search pane.
F4: Close current tab.
Plus: Add a pane.
Minus: Remove a pane.
Control + Tab: Focus previous tab.
Control + Shift + Tab: Focus next tab.
Control + B: Bring up Bible Reading Plan.
Control + D: Bring up devotional.
Control + F: Bring up advanced search.
Control + L: Bring up Library.
Control + M: Bring up Bible memorization.
Control + P: Bring up prayer journal.
Text positioning:
Up-arrow: scroll up one line.
Down-arrow: scroll down one line.
Page-up: scroll up one page.
Page-down: scroll down one page.
Control + plus: Increase text size.
Control + minus: Decrease text size.
Control + Home: Jump to beginning of reference work.
Control + End: Jump to end of reference work.
If you have a mouse on your device, it can be used in place of a touch screen. A click on the mouse is equivalent to a tap on the screen at the current mouse pointer position. If your mouse has a mouse wheel, it can be used to scroll text up or down.
Where drag operations are allowed, the mouse can be used just as when using a finger to drag. Specifically, dragging with a mouse involves these steps:
1) click and hold down the mouse button
2) move the mouse pointer while keeping the mouse button down
3) release the mouse button when your mouse pointer is in the new location.